I bought a Raspberry Pi 5 8GB Quick-Start AI Kit from CanaKit on October 22, 2024. It cost $256.90 and included a Hailo-8L accelerator that could operate at 13 tera-operations per second. For nearly two years, it waited patiently for a job, and new quick-start kits have risen to $339.95, or the accelerator alone as a hat is $76.95. The M.2 Hat+ lets me use other compatible devices, such as SSDs.

My attention had been on large language models. The Hailo-8L is not a small GPU for running a LLM chatbot. It is made for a different category of work: classification, object detection, pose estimation, image segmentation, and other fixed computer-vision models. Hailo released the newer Hailo-10H this January with LLM support, but I had not followed it closely. The hardware I already owned was waiting for the right question.
The question turned out to be simple: could I run a local object detector, give it a photograph, and see what it noticed? I tested it with an old image containing many things.
It only noticed me.
The first time a model put a rectangle around me and labeled it person, I was more delighted than I expected. It was not recognizing Lewis. It was recognizing a visual pattern that its training had taught it to call a person. Still, there is a small thrill in watching a computer move from “this is a collection of pixels” to “there is a person here.”
That was the beginning. I started drawing on the similarities with ALPRs. It’s not where I started, but license plates came later.

Detecting, locating, and reading are different things
Automated license-plate recognition (ALPR) isn’t a single magical model. It is a pipeline:
- Find the vehicle or likely plate location.
- Crop the plate and correct its perspective.
- Run OCR on the cleaned-up crop.
- Decide what, if anything, to keep and for how long.
This project only completed the first part: plate localization. The system draws candidate boxes around areas that might be plates. It does not read plate text, look up a vehicle owner, or send images to a cloud service.
That separation matters. A detector that mistakes a bumper sticker for a plate should not be promoted into a system that confidently invents text for the bumper sticker.
I had done something adjacent while detecting QR codes with phone cameras. A QR code has to be found, cropped, oriented, and transformed before it can be decoded. License plates have the same geometry problem. A plate photographed at an angle is a trapezoid; OCR works much better once software turns it into a near-rectangular crop.
Getting Hailo working on Ubuntu
My Pi runs Ubuntu 26.04 on a Raspberry Pi kernel, not Raspberry Pi OS. The usual Raspberry Pi package instructions were therefore not a direct fit. The essential requirement was a HailoRT runtime and PCIe driver that matched each other and could build for my exact kernel.
For my system, I used HailoRT 4.24.0 and the matching PCIe-driver package. The driver is a DKMS package, so it needs headers for the active kernel first.
sudo apt updatesudo apt install -y build-essential dkms \ linux-headers-$(uname -r)cd ~/hailo-4.24.0file *.debsudo dpkg --install hailort-pcie-driver_4.24.0_all.debsudo dpkg --install hailort_4.24.0_arm64.deb# Only if dpkg reports unmet dependencies:sudo apt-get -f installsudo dpkg --install hailort-pcie-driver_4.24.0_all.debsudo dpkg --install hailort_4.24.0_arm64.debsudo reboot
Checking the download with file is worthwhile. A download that silently became an account-login HTML page is not a Debian package merely because its filename ends with .deb.
After reboot, these checks established that the runtime, driver, firmware, and device were actually talking to one another:
hailortcli --versiondkms statusls -l /dev/hailo*hailortcli fw-control identify
On my Pi, HailoRT and firmware both reported version 4.24.0, the device identified as HAILO8L, and /dev/hailo0 appeared. That was the point at which I had an accelerator, not merely a package installation.
The Pi ran the model; Kaylee built it
There are two very different Hailo environments:
| Machine | Architecture | Job |
|---|---|---|
| Raspberry Pi 5 | ARM64 | Run a compiled Hailo Executable File through HailoRT |
| Kaylee | x86_64 | Compile and optimize reviewed model source into a Hailo-8L executable |
Hailo’s Dataflow Compiler is an x86 Linux toolchain. It does not run on the Pi. The Pi is the compact deployment target that runs a fixed model locally.
Kaylee is an x86_64 Ubuntu computer, so I used it as the build host. I kept the compiler inside a Docker image based on Ubuntu 22.04 rather than scattering proprietary dependencies across the host. The isolated image used Hailo Dataflow Compiler 3.34.0, HailoRT 4.24.0, and Hailo Model Zoo 2.19.0.
Building the compiler image and giving it one GPU
This was what turned Kaylee from a convenient file server into a real Hailo build machine.
Hailo distributes the Dataflow Compiler as a separately licensed x86_64 Python wheel. It also supplied the Ubuntu 22.04 HailoRT Docker base image. I kept those downloaded components together in a restricted local directory and did not put them in source control.
The image has three jobs: provide Hailo’s supported userspace, install the exact compiler and Model Zoo wheels, and provide the CUDA user-space libraries the compiler needs for GPU-backed optimization. The Dockerfile I used was substantially this:
FROM hailo_docker_hailort_ub2204:4.24.0USER rootRUN apt-get update \ && DEBIAN_FRONTEND=noninteractive apt-get install -y --no-install-recommends libgl1 \ && rm -rf /var/lib/apt/lists/*# Obtain these files from Hailo under the applicable license.# Do not commit them to a public repository.COPY hailo_dataflow_compiler-3.34.0-py3-none-linux_x86_64.whl /opt/hailo/wheels/COPY hailo_model_zoo-2.19.0-py3-none-any.whl /opt/hailo/wheels/RUN /local/workspace/hailo_platform_venv/bin/pip install --no-cache-dir \ /opt/hailo/wheels/hailo_dataflow_compiler-3.34.0-py3-none-linux_x86_64.whl \ /opt/hailo/wheels/hailo_model_zoo-2.19.0-py3-none-any.whl \ && /local/workspace/hailo_platform_venv/bin/pip check \ && /local/workspace/hailo_platform_venv/bin/hailo --version# Needed by this DFC release for GPU-backed optimization.RUN /local/workspace/hailo_platform_venv/bin/pip install --no-cache-dir \ 'tensorflow[and-cuda]==2.18.0' \ && /local/workspace/hailo_platform_venv/bin/pip checkENV PATH=/local/workspace/hailo_platform_venv/bin:${PATH}WORKDIR /work
Before building, I loaded the Hailo base-image bundle and placed the two Hailo wheels beside the Dockerfile. The exact filenames change with the Hailo software suite, but the architecture does not: the compiler wheel must be Linux x86_64, while the HailoRT runtime package installed on the Pi is ARM64.
# On Kaylee. Load the image supplied# in Hailo's runtime Docker bundle.docker load -i /path/to/hailo_docker_hailort_ub2204.tarmkdir -p ~/hailort-files/dfc-buildcd ~/hailort-files/dfc-build# Copy Dockerfile.dfc, the DFC wheel,# and the matching Model Zoo wheel here.docker build -t local/hailo-dfc:3.34.0-hailort4.24 \ -f Dockerfile.dfc .
The first calibration build ran, but Docker could not expose Kaylee’s NVIDIA card to the container. The compiler therefore finished at optimization level 0. That output was worth keeping as a failed build record, but it was not the model I wanted to deploy.
After installing and configuring the NVIDIA Container Toolkit on Kaylee, I verified that Docker (not just the host) could see a single GPU. Restricting the build to device 0 also made the resource decision explicit rather than letting a compilation job use every available card.
nvidia-smidocker run --rm --network none --gpus 'device=0' \ local/hailo-dfc:3.34.0-hailort4.24 \ python - <<'PY'import tensorflow as tfgpus = tf.config.list_physical_devices('GPU')print(gpus)assert len(gpus) == 1, 'Expected exactly one GPU in the build container'PY
Only after that check passed did I do the real calibration/optimization build. I ran the container with no network access and mounted only three directories: reviewed model source as read-only, calibration images as read-only, and an output directory that could receive the compiled artifact.
docker run --rm --network none --gpus 'device=0' \ -v "$PWD/source:/work/source:ro" \ -v "$PWD/calibration:/work/calibration:ro" \ -v "$PWD/output-gpu:/work/output" \ local/hailo-dfc:3.34.0-hailort4.24 \ hailo --version
The last command is deliberately only a smoke test. The actual Hailo compile command depends on the checked-in network configuration, optimization script, calibration manifest, and target architecture. My build explicitly targeted HAILO8L, used all 1,024 calibration images, a calibration batch size of 8, and optimization level 2. The important reproducibility rule is to pin those files and record the command, rather than substitute a nearby example command and hope it produces an equivalent executable.
The first useful lesson came from an old Hailo model. The older model zoo had a Tiny-YOLO detector for license plates. Its precompiled file downloaded successfully, but current HailoRT refused to load it:
HAILO_HEF_NOT_SUPPORTED (92)... this HEF is outdated and no longer supported
That was useful information. I did not downgrade the Pi to make an obsolete binary work. I kept the reviewed ONNX source model and rebuilt it for the Hailo-8L and the runtime actually installed on the Pi.
Rebuilding the ONNX model for the Hailo-8L
That rebuild was a real compilation pipeline, not a conversion by filename. I kept four inputs together on the GPU machine: the reviewed ONNX file, a directory of 1,024 calibration images, the Hailo model script, and a dedicated output directory. The relevant layout was:
/home/ai/alpr-build/ source/tiny_yolov4_license_plates/tiny_yolov4_license_plates.onnx calibration/coco2017-vehicle-1024/images/ output-gpu/
The model script is important enough to preserve with the build. hailomz selected the script associated with the named tiny_yolov4_license_plates network; I copied the exact final version into the build provenance. It tells the compiler how to normalize input pixels and sets the quantization and calibration choices used to make an executable for the accelerator. My pinned production settings were:
normalization1 = normalization([0.0, 0.0, 0.0], [255.0, 255.0, 255.0])post_quantization_optimization(finetune, policy=disabled)quantization_param(output_layer1, precision_mode=a16_w16)quantization_param(output_layer2, precision_mode=a16_w16)model_optimization_config(globals, output_encoding_vector=enabled)model_optimization_config(calibration, batch_size=8, calibset_size=1024)model_optimization_flavor(optimization_level=2, compression_level=0)
With the Hailo Dataflow Compiler / Model Zoo container built in the previous section, this was the actual compile invocation. I used an empty, purpose-made output directory; do not point it at a directory containing anything you care about.
BUILD=/home/ai/alpr-buildOUTPUT="$BUILD/output-gpu"# Refuse to mix a new build with old output files.mkdir -p "$OUTPUT"if [ -n "$(find "$OUTPUT" -mindepth 1 -maxdepth 1 -print -quit)" ]; then echo "Choose an empty output directory" >&2 exit 1fidocker run --rm --network none --gpus 'device=0' \ -v "$BUILD:/build" \ -w /build/output-gpu \ --entrypoint hailomz local/hailo-dfc:3.34.0-hailort4.24 \ compile tiny_yolov4_license_plates \ --hw-arch hailo8l \ --ckpt /build/source/tiny_yolov4_license_plates/tiny_yolov4_license_plates.onnx \ --calib-path /build/calibration/coco2017-vehicle-1024/images \ --calib-set-size 1024 \ --start-node-names input \ --end-node-names Conv_100 Conv_453sha256sum "$OUTPUT/tiny_yolov4_license_plates.hef"
The one hailomz compile command performs several distinct jobs: it parses the ONNX graph into Hailo’s intermediate representation, applies the model script, calibrates and quantizes the network from the image set, maps it onto a Hailo-8L, and emits a .hef executable. The GPU accelerates the optimization step; the Hailo-8L itself is the target of the final allocation, not a device passed through to Docker.
The resulting executable expects UINT8 NHWC images at 416×416×3 and exposes two feature-map outputs, 13×13×18 and 26×26×18. Recording the ONNX checksum, calibration manifest, model script, container tag, command, compiler log, and final HEF checksum turns “I rebuilt it” into something I can audit or repeat when the runtime changes again.
Important terminology correction: I did not train Tiny-YOLO from scratch. I compiled and quantized an existing detector for this accelerator. Training or fine-tuning a new model is a separate, later project.
Calibration is not training, but it changes the result
The compiler needs representative images to convert model values into the accelerator’s compact numeric format. That process is calibration. It does not teach the model new categories, but it still affects the resulting executable.
I used a deterministic 1,024-image calibration set based on COCO 2017 validation images that is well known for its annotations and being fairly compact:
- 796 images with vehicle-related categories
- 228 repeatable supplemental images
- personal car photographs held back for private validation
Selecting images is separate from making a 416×416 tensor
The calibration files were ordinary COCO JPEGs, not a folder of pre-stretched 416-pixel pictures. I selected them from the COCO annotations with a saved manifest, copied those exact source images into the calibration directory, and left my own car photographs out of it. During compilation, the Model Zoo preprocessing associated with the network reads each calibration image and applies the model’s expected input transformation before it measures ranges for quantization.
The 416×416×3 figure instead describes the runtime tensor contract of the compiled HEF. A camera photograph can be 4032×3024, portrait-oriented, or any other size. Before inference, my Pi preview program does the following:
- Decodes the original JPEG with OpenCV.
- Converts OpenCV’s BGR pixels to RGB.
- Scales the image by the smaller of
416 / widthand416 / height, preserving its aspect ratio. - Place the resized result in the center of a 416×416 RGB canvas, filling the unused edges with neutral gray.
- Passes the resulting
UINT8pixels to HailoRT in NHWC order, while retaining the scale and padding values to map detections back onto the original photograph.
The core of that letterbox conversion looks like this:
cv::Mat rgb;cv::cvtColor(source, rgb, cv::COLOR_BGR2RGB);float scale = std::min(416.0f / rgb.cols, 416.0f / rgb.rows);int width = std::max(1, static_cast<int>(std::round(rgb.cols * scale)));int height = std::max(1, static_cast<int>(std::round(rgb.rows * scale)));int pad_x = (416 - width) / 2;int pad_y = (416 - height) / 2;cv::Mat input(416, 416, CV_8UC3, cv::Scalar(114, 114, 114));cv::Mat resized;cv::resize(rgb, resized, cv::Size(width, height), 0, 0, cv::INTER_LINEAR);resized.copyTo(input(cv::Rect(pad_x, pad_y, width, height)));
That is why I didn’t simply squash every photograph into a square. Squashing changes a plate’s aspect ratio; letterboxing preserves the geometry and gives the decoder the information it needs to restore a detected box to the original image. The calibration selection, this preprocessing policy, and the model script must travel with the HEF if the result is to be repeatable.
For anyone repeating this sort of build, keep the calibration-selection script, image manifest, source-model hash, compiler version, and final model hash. Otherwise, “I compiled it again” can quietly mean “I built something different.”
mkdir -p ~/cococd ~/cococurl --fail --location -O \ https://images.cocodataset.org/zips/val2017.zipcurl --fail --location -O \ https://images.cocodataset.org/annotations/annotations_trainval2017.zipunzip -tqq val2017.zipunzip -tqq annotations_trainval2017.zipsha256sum val2017.zip annotations_trainval2017.zip
My build host ran into a certificate-hostname issue while downloading the archives. I recorded the issue and verified the ZIP files afterward, but the better solution is to fix certificate validation or use a trusted mirror rather than normalize insecure downloads.
The level-0 build proved the recipe basically worked; it didn’t create a release candidate. The GPU-backed rebuild described above is the artifact I kept and tested on the Pi.
The final Hailo-8L detector used a fixed 416×416 RGB input and two raw Tiny-YOLO output tensors. Its SHA-256 was:
45ad20ccc20980b27c1a7613d051f760adcade4b52a8f1b355599d575bb0e358
I copied the file to the Pi, verified its hash again, then parsed and benchmarked that exact artifact:
sha256sum tiny_yolov4_license_plates-hailo8l-gpu.hefhailortcli parse-hef tiny_yolov4_license_plates-hailo8l-gpu.hefhailortcli benchmark tiny_yolov4_license_plates-hailo8l-gpu.hef
It worked: about 474 hardware-only frames per second and 3.48 milliseconds of hardware latency. Those are accelerator-only figures, not the speed of a camera, image resizing, box drawing, or OCR. Still, they proved that the model and accelerator were finally a real pair.
A successful accelerator does not hand you rectangles
The Hailo output was not a friendly list of plates. It was two raw tensors. Something still had to apply Tiny-YOLO anchors and sigmoid transforms, restore coordinates from a letterboxed 416-pixel image to the original photo, remove duplicate boxes with non-maximum suppression, write JSON, and draw the annotations.
I built that part as a small native C++ program on the Pi using HailoRT and OpenCV. I didn’t install a large Python environment, TAPPAS, or an example framework just to run one fixed local detector.
The small C++ preview program
The preview was not a black box. Its source bundle had three deliberately small files: hailo_alpr_preview.cpp for image I/O, HailoRT invocation, and result files; alpr_decoder.hpp for the fixed Tiny-YOLO decode/NMS math; and a CMakeLists.txt. The program’s top-level flow was this:
int main(int argc, char **argv) { const auto args = parse_arguments(argc, argv); // Keep the original dimensions and the letterbox transform together. const cv::Mat original = cv::imread(args.input, cv::IMREAD_COLOR); Letterbox transform; const cv::Mat input = make_416_rgb_letterbox(original, transform); // The HEF path and its SHA-256 were fixed before this program ran. const RawTensors raw = run_hailo_hef( "tiny_yolov4_license_plates-hailo8l-gpu.hef", input); // Tiny-YOLO has two output grids. Decode both, then remove overlaps. std::vector<Candidate> candidates; append(candidates, decode_yolov4(raw.grid_13, 13, 13, 32)); append(candidates, decode_yolov4(raw.grid_26, 26, 26, 16)); const auto plates = non_maximum_suppression(candidates, 0.45f); // Undo letterboxing before writing anything for a human to review. const auto boxes = restore_to_original_pixels( plates, transform, original.cols, original.rows); write_detector_only_json(args.output_json, boxes, original.size()); write_annotated_jpeg(args.annotated_jpeg, original, boxes);}
The decoder was fixed to this network, rather than assuming that any arbitrary Hailo model has the same output format. This is the essential decoding loop: each output-grid cell has three anchors, each anchor has six values, and the code converts logits into a candidate rectangle and score.
for (int row = 0; row < rows; ++row) { for (int col = 0; col < cols; ++col) { const size_t cell = static_cast<size_t>(row) * cols + col; for (int anchor = 0; anchor < 3; ++anchor) { const size_t base = cell * 18 + anchor * 6; const float confidence = sigmoid(output[base + 4]) * sigmoid(output[base + 5]); if (!std::isfinite(confidence) || confidence < score_threshold) continue; const float x = (sigmoid(output[base]) * 1.05f - 0.025f + col) * stride; const float y = (sigmoid(output[base + 1]) * 1.05f - 0.025f + row) * stride; const float width = std::exp(std::clamp(output[base + 2], -20.0f, 20.0f)) * anchors[anchor][0]; const float height = std::exp(std::clamp(output[base + 3], -20.0f, 20.0f)) * anchors[anchor][1]; if (std::isfinite(x) && std::isfinite(y) && std::isfinite(width) && std::isfinite(height) && width > 0.0f && height > 0.0f) candidates.push_back({x, y, width, height, confidence}); } }}
The remaining NMS function sorts candidates by confidence and suppresses later candidates whose intersection-over-union with a kept box exceeds the chosen threshold. That is why the program could create both a machine-readable JSON result and an annotated JPEG, rather than merely reporting that the accelerator ran.
# On the Pi: retrieve a source bundle from the x86 build host.scp ai@kaylee:/path/to/alpr-detector-preview-source.tar.gz .printf '%s %s\n' 'EXPECTED_SHA256' alpr-detector-preview-source.tar.gz | sha256sum -c -tar -xzf alpr-detector-preview-source.tar.gzcd ~/alpr-preview-bundlecmake -S . -B build -DCMAKE_BUILD_TYPE=Releasecmake --build build --parallel 2ctest --test-dir build --output-on-failure
The build was not flawless on the first try. An old CMake target referenced a source file that was not in the bundle, then a decoder test lacked the correct include directory. Both were ordinary mistakes, and both were useful reminders: reproducibility starts with a complete source bundle and a passing test.
The first private plate-localization test
The preview program accepts a JPEG, runs locally, writes JSON, and creates an annotated image. Its output intentionally says preliminary localization only and contains no OCR text.
mkdir -p ~/alpr-validation-results-preliminary/{json,annotated}~/alpr-preview-bundle/build/hailo-alpr-preview \ --input "$(realpath ~/alpr-validation-jpeg/IMG_7035.jpeg)" \ --output-json "$HOME/alpr-validation-results-preliminary/json/IMG_7035.json" \ --annotated-jpeg "$HOME/alpr-validation-results-preliminary/annotated/IMG_7035.jpg"python3 -m json.tool \ ~/alpr-validation-results-preliminary/json/IMG_7035.json
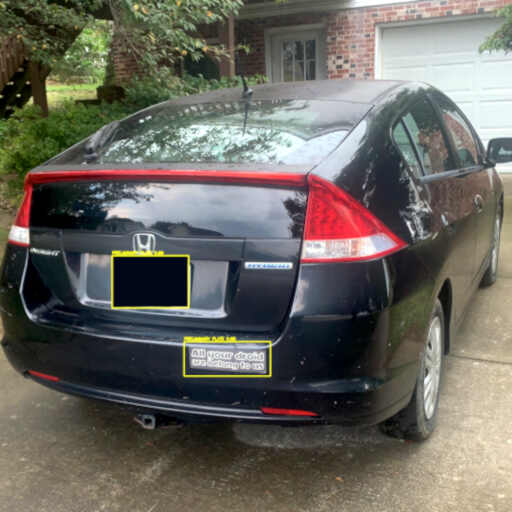
Four and a half hours after figuring out how to detect people, the first result came back detecting a license plate. It found the real plate in a 4032 by 3024 image with 99.1% confidence. It also found another plate-shaped object at 64.8%. The extra box was a bumper sticker.
That is not a failure to hide. It is the baseline.
I reviewed 41 private driveway and parking-lot photographs containing 42 actual plate instances. The detector found 41 plates and missed one. It also produced 11 extra boxes: ten bumper stickers and one headlight.

| Measure | Preliminary result |
|---|---|
| Precision | 78.85% |
| Recall | 97.62% |
| F1 score | 87.23% |
Those are not ready-to-read-license-plate numbers. They are a promising localization baseline with a clear failure mode: on my car, bumper stickers are sufficiently plate-like to fool the model. One image also produced a headlight candidate. Another detected a sticker while missing the actual plate. One image contained two plates, both of which needed separate review.


That is exactly why detection and OCR need to stay separate. A false plate crop followed by OCR can produce plausible nonsense, and plausible nonsense is worse than an obvious yellow box around a bumper sticker.
The privacy question arrived before OCR did
This experiment made the controversy around automated license-plate readers much less abstract. The individual technical ingredients are increasingly inexpensive: a camera, a small computer, a detector, local storage, encryption, and a retention policy.
It would be possible to design a system that keeps encrypted records locally, deletes ordinary sightings after a short period, and answers only a narrow question later: “Did this camera see this particular plate, and when?” A continuous cloud upload is not technically necessary.
But local processing does not automatically make surveillance harmless. What is collected? Who can search it? How long is it kept? What happens when the model is wrong? What happens when somebody uses the default password… perhaps 12345, because apparently we have learned nothing from both Space Balls and real surveillance products?
For now, I am not deploying a plate-reader network. I am learning object detection, measuring its mistakes, and keeping the resulting images private.
OCR will be a separate fixed local component with an alphanumeric allowlist. That matters for my own plate, which has letters and no numbers. The likely local option is Tesseract’s LSTM OCR engine on the Pi CPU, with a local English model and a strict A–Z and 0–9 allowlist. That differs greatly from sending plate crops to a cloud API or an online lookup service.
Before that, I have more ordinary object detection to explore: people, dogs, useful objects in old photographs, and perhaps locating my own face among a large pile of pictures.
Although I cannot yet tell whether the model is making a technical mistake or delivering a personal insult. So far, it keeps highlighting pictures of my butt.
Notes for anyone trying this
- Match HailoRT runtime, PCIe driver, and firmware versions.
- Install headers for the exact running kernel before installing the DKMS driver.
- Treat ARM64 inference and x86 model compilation as separate environments.
- Do not assume an old Hailo executable will run on a current runtime; test it with parse-hef.
- Keep model source, calibration manifest, compiler version, and hashes together.
- Benchmark the exact model on the actual accelerator.
- Evaluate on private validation photos and record false positives as carefully as successes.
- Keep OCR disabled until the detector supplies dependable crops.
- Build privacy and retention decisions into the design before the system starts collecting useful data.