The big deal about apps on a phone is that they can receive push notifications. Just like a native application on a mobile phone, we can send a message to the app to wake up the service worker to notify the user. Push notifications are a combination of two Web API’s: Notification API and Push API.
We already have a service worker registered from Vite PWA. Now it’s time to actually make use of it. We’ve got a few steps involved to pull this off.
Service Worker Registration- Notification
- Permission Request
- Creating notifications
- Push Subscription – request permission to use Push API
- Server-side integration – Store push subscription for each user
- Notification Content
- Push Subscription Endpoint
- Chrome: Firebase Cloud Messaging
- Firefox: Mozilla’s Push Service
- Push Service Delivery – forward notification to users browser using push subscription endpoint
- Service Worker Handling – display notification via Notification API
- Title, Body, Icon, etc.
- Handle click event to open a page or perform action
We just need to take one step at a time. We’ve already setup separate projects for our frontend, backend, and database as well as automated deployments & migrations. Let’s focus on notifications.

Our service worker is unable to request permission to send notifications. That’s done through the web UI. We have access to a Notification object that tells us what the current permissions state is via Notifications.permissions
- default – No permission and not requested
- granted – End user accepted permissions
- denied – End user denied permissions
The service worker will see “denied” by default. It’s important to note that a user could grant permissions, and then turn them off. We wouldn’t know that permission to send notifications was revoked unless we check it periodically, or just before we attempt to send a notification.
Let’s setup our code to do a few things
- Display the current permission state
- Add a button to request permissions
- Add a button to create a notification
- Detect permission changes
import { useState } from 'react';

const NotificationStatus = () => {
  const [permission, setPermission] = useState(
    Notification.permission,
  );
  const handleRequest = () => {
    Notification.requestPermission().then((permission) => {
      setPermission(permission);
    });
  };
  const handleNotify = () => {
    if (permission !== Notification.permission) {
      setPermission(Notification.permission);
      if (permission !== 'granted') return;
    }
    const notification = new Notification('Hello World.');
    notification.onerror = (error) => {
      console.log('Notification Error', error);
    };
    notification.onclick = () => {
      console.log('Notification clicked');
    };
    notification.onclose = () => {
      console.log('Notification closed');
    };
  };
  return (
    <div>
      <h4>Notifications</h4>
      <p>Permission: {permission}</p>
      {permission === 'default' ? (
        <button onClick={handleRequest}>
          Allow Notifications
        </button>
      ) : null}
      {permission === 'granted' ? (
        <button onClick={handleNotify}>Notify Me</button>
      ) : null}
    </div>
  );
};

export default NotificationStatus;
So let’s see what our component looks like.


In the above steps, I was able to grant permission and send myself a notification. Notifications seem to pop up in different locations. Earlier I had found the notification in the upper right hand corner on a different monitor than the one that the website was using. Just now, I had to hunt across a few monitors until I noticed the notification was actually in my notification center.
Once I revoked the permission, I was prompted to reload the page. I decided to attempt to send myself a notification instead. As soon as I did, the guard in place updated the permission state and hid the button to send notifications. We don’t have an event to listen for permission changes. The only way to get that button back is to turn notifications back on manually and refresh the page, or reset the permissions and refresh to page to request permissions again. Another option would be to set an interval timer to continue to monitor the permissions.
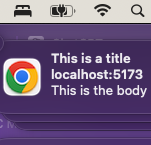
Now, let’s move notifications into our service worker. As stated earlier, we can’t request notification permissions within the service worker – but we can create them once they have been granted. The first step is to change our code to send a message to the service worker.
import { useState } from 'react';

const NotificationStatus = () => {
  const [permission, setPermission] = useState(
    Notification.permission,
  );
  const handleRequest = () => {
    Notification.requestPermission().then((permission) => {
      setPermission(permission);
    });
  };
  const handleNotify = () => {
    if (permission !== Notification.permission) {
      setPermission(Notification.permission);
      if (permission !== 'granted') return;
    }
    if (navigator.serviceWorker.controller) {
      navigator.serviceWorker.controller.postMessage({
        type: 'NOTIFICATION',
        title: 'This is a title',
        options: {
          body: 'This is the body',
          icon: '/favicon.ico',
        },
      });
    } else {
      console.log('service worker not found');
    }
  };
  return (
    <div>
      <h4>Notifications</h4>
      <p>Permission: {permission}</p>
      {permission === 'default' ? (
        <button onClick={handleRequest}>
          Allow Notifications
        </button>
      ) : null}
      {permission === 'granted' ? (
        <button onClick={handleNotify}>Notify Me</button>
      ) : null}
    </div>
  );
};

export default NotificationStatus;
Now we need to update our service worker to listen to the message event and create a notification.
/// <reference no-default-lib="true" />
/// <reference lib="webworker" />
/// <reference lib="esnext" />
import {
  precacheAndRoute,
  createHandlerBoundToURL,
  cleanupOutdatedCaches,
} from 'workbox-precaching';
import {
  NavigationRoute,
  registerRoute,
} from 'workbox-routing';

declare const self: ServiceWorkerGlobalScope;

precacheAndRoute(self.__WB_MANIFEST || []);
cleanupOutdatedCaches();

let allowlist;
if (import.meta.env.DEV) allowlist = [/^\/$/];

registerRoute(
  new NavigationRoute(
    createHandlerBoundToURL('index.html'),
    { allowlist },
  ),
);

self.addEventListener('install', () => self.skipWaiting());
self.addEventListener('activate', () =>
  self.clients.claim(),
);

self.addEventListener(
  'message',
  ({ data: { type, ...data } }) => {
    switch (type) {
      case 'NOTIFICATION':
        self.registration
          .showNotification(data.title, data.options)
          .catch((error) => console.error(error));
        break;
      case 'SKIP_WAITING':
        self.skipWaiting();
        break;
      default:
        console.log('Unknown message type: %s', type);
        break;
    }
  },
);
Given that service workers are tricky to setup, here is my Vite PWA configuration to help you get started. My service worker is located in src/periplux-sw.ts and gets converted to a JavaScript file in the dist folder.
{
  srcDir: 'src',
  filename: 'periplux-sw.ts',
  strategies: 'injectManifest',
  injectRegister: false,
  registerType: 'prompt',
  workbox: {
    globDirectory: path.resolve(__dirname, 'public'),
    cleanupOutdatedCaches: true,
    clientsClaim: true,
    globPatterns: ['**/*.{js,css,html,ico,png,svg}'],
    globIgnores: [
      '**/node_modules/**/*',
      '**/periplux-sw.js',
    ],
  },
  devOptions: {
    enabled: true,
    type: 'module',
    navigateFallback: 'index.html',
  },
  manifest,
}
One response to “Notification API”
[…] (via Push API subscription) and wake up the service worker to perform a task, such as using the Web Notification API. In fact – if you don’t use the Notification API when handling a push event, the web […]